Coding for movement
Continuing on from part 1 of the tutorial, we will now try to make some basic movements with our robot. Our goal is to eventually create a programmatic interface, that will allow us to program longer movement sequences.
The below program will make a simple square movement:
	from gpiozero import Robot
	from time import sleep

	robby = Robot (left=(6,13), right=(26,19))

	while True:
	        robby.forward()
	        sleep(.9) # for < ~1 ft distance
	        robby.stop()
	        sleep(3)
	        robby.right()
	        sleep(.4) # for 90 deg turn
	        robby.stop()
	        sleep(3)
We now to install the software required to create our user interface for controlling the robot. We will achieve this by create a browser based web interface. Lets get started!
We need to install a webserver to server our UI – installing and configuring lighttpd
Lighttpd is preferred webserver for embedded systems. There are some issues with permissions, which we will look into a bit later.
We need to first install the webserver. Raspbian repo supports a huge variety of software, including this:
$ sudo apt-get -y install lighttpd
$ sudo lighttpd-enable-mod cgi
$ sudo lighttpd-enable-mod fastcgi
$ sudo service lighttpd force-reload
The important files to consider are:
/etc/lighttpd/lighttpd.conf
/etc/lighttpd/conf-enabled/10-cgi.conf
The essential changes required are:
- Pointing to the server document root with my HTML files.
- Changing cgi.conf to point to the cg-bin folder with my scripts and the pythonRoot application with root permissions
$ cat /etc/lighttpd/lighttpd.conf
server.modules = (
        "mod_indexfile",
        "mod_access",
        "mod_alias",
        "mod_redirect",
)  #server.document-root        = "/var/www/html"
server.document-root        = "/var/www"
server.upload-dirs          = ( "/var/cache/lighttpd/uploads" )
server.errorlog             = "/var/log/lighttpd/error.log"
server.pid-file             = "/var/run/lighttpd.pid"
server.username             = "www-data"
server.groupname            = "www-data"
server.port                 = 80

# strict parsing and normalization of URL for consistency and security
# https://redmine.lighttpd.net/projects/lighttpd/wiki/Server_http-parseoptsDetails
# (might need to explicitly set "url-path-2f-decode" = "disable"
#  if a specific application is encoding URLs inside url-path)
server.http-parseopts = (
  "header-strict"           => "enable",# default
  "host-strict"             => "enable",# default
  "host-normalize"          => "enable",# default
  "url-normalize-unreserved"=> "enable",# recommended highly
  "url-normalize-required"  => "enable",# recommended
  "url-ctrls-reject"        => "enable",# recommended
  "url-path-2f-decode"      => "enable",# recommended highly (unless breaks app)
 #"url-path-2f-reject"      => "enable",
  "url-path-dotseg-remove"  => "enable",# recommended highly (unless breaks app)
 #"url-path-dotseg-reject"  => "enable",
 #"url-query-20-plus"       => "enable",# consistency in query string
)

index-file.names            = ( "index.php", "index.html" )
url.access-deny             = ( "~", ".inc" )
static-file.exclude-extensions = ( ".php", ".pl", ".fcgi" )

compress.cache-dir          = "/var/cache/lighttpd/compress/"
compress.filetype           = ( "application/javascript", "text/css", "text/html", "text/plain" )

# default listening port for IPv6 falls back to the IPv4 port
include_shell "/usr/share/lighttpd/use-ipv6.pl " + server.port
include_shell "/usr/share/lighttpd/create-mime.conf.pl"
include "/etc/lighttpd/conf-enabled/*.conf"

#server.compat-module-load   = "disable"
server.modules += (
        "mod_compress",
        "mod_dirlisting",
        "mod_staticfile",
)
$ cat /etc/lighttpd/conf-enabled/10-cgi.conf
# /usr/share/doc/lighttpd/cgi.txt

server.modules += ( "mod_cgi" )

$HTTP["url"] =~ "^/cgi-bin/" {
        cgi.assign = ( "" => "" )
        alias.url += ( "/cgi-bin/" => "/var/www/cgi-bin/" )
}

## Warning this represents a security risk, as it allow to execute any file
## with a .pl/.py even outside of /usr/lib/cgi-bin.
#
cgi.assign      = (
#       ".pl"  => "/usr/bin/perl",
        ".py"  => "/usr/bin/pythonRoot",
)
One these changes are done, restart your webserver:
$sudo /etc/init.d/lighttpd restart
Creating the cgi-bin scripts:
I decided to use python scripts to navigate my robot buggy. So, I decided to individual scripts for each movement: forward, backward, left and right.
You can follow the instructions from here https://projects.raspberrypi.org/en/projects/build-a-buggy/5 to create these scripts. The instructions are extremely basic and very helpful.
These movements are done in small units, so that we can use these as programmable units to create more complicated movements.
The scripts themselves involve using the Robot package available in raspbian. These packages internally call GPIO driver, which require root access.
Since the webserver runs as “www-data” user, these python scripts will not get executed when invoked using HTML. We need to do something special to make this work.
http://davstott.me.uk/index.php/2013/03/17/raspberry-pi-controlling-gpio-from-the-web/ provides an excellent overview of what we need to do.
(interesting link about why lighttpd does not allow itself to be run as root: http://www.sunspot.co.uk/Projects/Joggler/lighttpd_as_root.html)
Essentially, we need to create a copy the python binary and give it root group ownership. This is a security hack and we need to be careful doing this. Unfortunately, since most hardware access to i2c etc requires root access, this is a quick and dirty method to do what we need to do. A more complex program will require a better architecture than this.
Make sure that the scripts point to the correct python binary (pythonRoot below)
$ cat forward.py
#!/usr/bin/pythonRoot

print "Content-type:text/html\n"
##print "<h1>This is the Home Page</h1>"

import cgi,cgitb
cgitb.enable() #for debugging

from gpiozero import Robot
from time import sleep

robby = Robot (left=(6,13), right=(26,19))

robby.forward()
sleep(.2) # for < ~1 ft distance
robby.stop()
Additionally you can add the lines:
import cgi,cgitbcgitb.enable() #for debugging
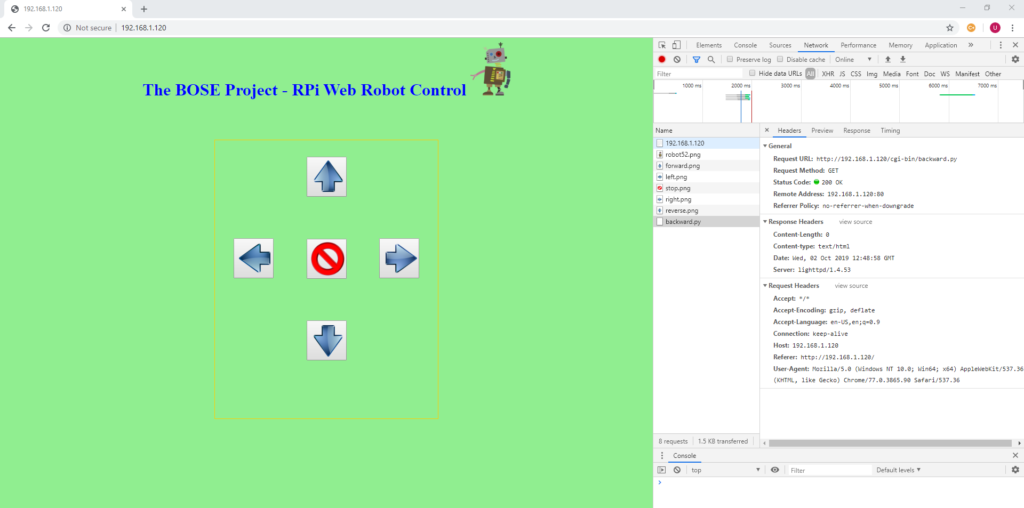
These will allow you to debug any issues with the webserver using Chrome developer tools:

Once the scripts are ready, change their permissions using chmod 755 * in /var/www/cgi-bin/
Create a basic HTML script using the attached index.html as reference.
The HTML creates some buttons and points to the respective scripts.
Another nice resource to learn more about python CGI scripting:
https://www.w3resource.com/python/cgi-programming.php
http://www.learningaboutelectronics.com/Articles/How-to-run-Python-on-a-web-server.php
Once done successfully, you should be able to see the movement like the video below:
All the code is available in Bitbucket, including the webserver configuration. Use the following command to download the repo:
git clone https://boseontherocks@bitbucket.org/boseontherocks/projects_1.git
The code used in this post is available in the folder robot_1