Using the pi-hole project in your home network
Credits:
https://blog.sleeplessbeastie.eu/2018/01/11/how-to-install-and-configure-pi-hole/
https://www.jeffgeerling.com/blog/2017/setting-pi-hole-whole-home-adtracker-blocking
https://scotthelme.co.uk/securing-dns-across-all-of-my-devices-with-pihole-dns-over-https-1-1-1-1/
Pi-hole is a project that allows us to block ads from our local networks. It intercepts the requests right at the gateway to your home network, as it works like a DNS server. You might even see some improvement in your network bandwidth speed. As the name suggests, we use the Raspberry Pi to install this really useful software.
Lets get started!
Download the Raspbian image from https://www.raspberrypi.org/downloads/raspbian/ . I have started with Raspbian-stretch-lite. I used the torrent download since the direct client download was not working. Unzip the image and you should see a file like “2018-06-27-raspbian-stretch-lite.img”
We need to now flash this to the SD card. Insert the SD card into the PC. I am using etcher to flash the image. This utility is available for Mac, Windows and Linux. You can check it out here: https://etcher.io/

For a Linux system, you can follow the below commands:
- Open Terminal, and run diskutil list
- See which disk the microSD card is (e.g. /dev/disk2), then unmount the card: diskutil unmountDisk /dev/disk2).
- Change directories into the directory where you downloaded Raspbian Jessie Lite (e.g. cd ~/Downloads).
- Run the following command to write the disk image to the microSD card: sudo dd if=2017-03-02-raspbian-jessie-lite.img of=/dev/rdisk2 bs=1m
- Use the filename for the image version you downloaded; it might be different than the if shown above.
- Note that the of (output) is using /dev/rdisk2—don’t use /dev/disk2 because that will result in a much slower copy operation.
- If you have pipeviewer installed, you can use pv yyyy-mm-dd-raspbian-jessie.img | sudo dd of=/dev/rdisk2 bs=1m instead to show copy progress.
- After the copy is finished, you should see a new boot SD card mounted on your computer.
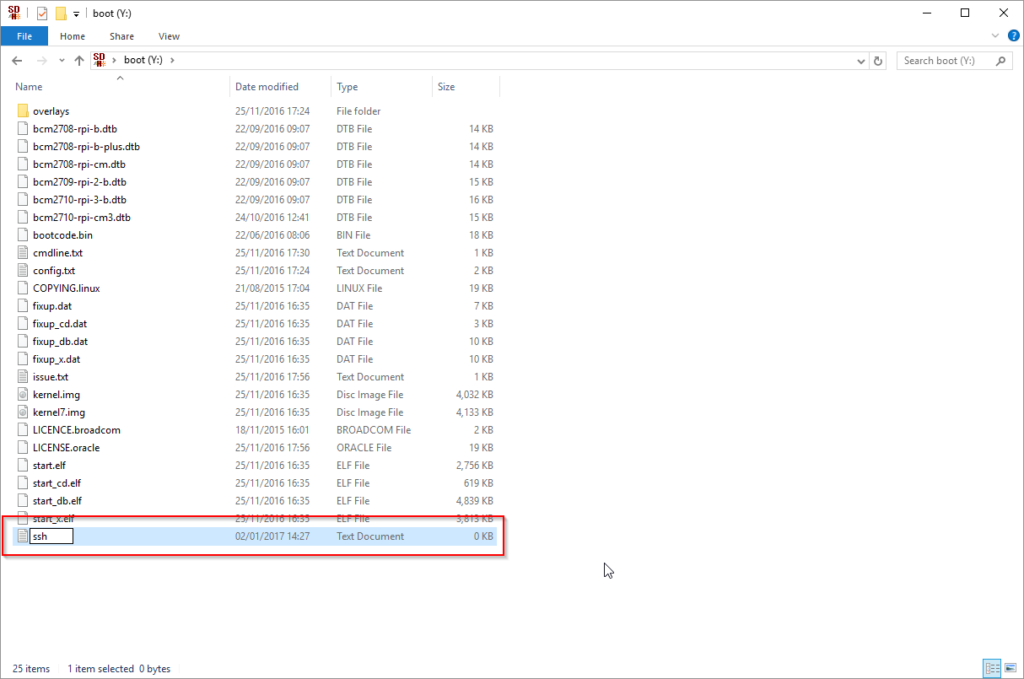
Next comes a tricky part. I need to enable the raspberry pi without really having access to it using a keyboard, mouse and monitor. Such setups are called headless setups. To enable headless raspberry PI, create a file called SSH without any extensions on the SD card root directory (https://hackernoon.com/raspberry-pi-headless-install-462ccabd75d0)

Determine the DHCP IP address your pi has picked by by checking the active DHCP client list on your router:

Connect to SSH using default credentials pi:raspberry
Once you’re logged in let’s get everything up to date with sudo apt-get update followed by sudo apt-get
dist-upgrade and once those have completed reboot the rPi with sudo reboot. Once the rPi
has rebooted you’re good to move to the next steps.
Set a static IP address: sudo nano /etc/dhcpcd.conf to edit the configuration, then add the following to the end (using the settings specific to your network/IP):
1.	Set a static IP address: sudo nano /etc/dhcpcd.conf to edit the configuration, then add the following to the end (using the settings specific to your network/IP):
2.	interface eth0
3.	static ip_address=10.0.1.24
4.	static routers=10.0.1.1
5.	static domain_name_servers=10.0.1.1
6.	Reboot the Pi (sudo reboot) and log back in via SSH.
7.	Run sudo raspi-config to configure basic settings:
        o Set a new (secure) password.
        o Set a hostname (e.g. pi-hole).
8.	Restart the Pi after changing those settings.
It’s a good idea to set a static IP address for your Pi—either in the Pi’s own settings, or (preferably) on your network’s router (if the router allows you to assign static IP addresses to devices based on MAC address).
Set up Pi Hole
With the preliminary setup complete we will start the pi-hole installation. You can read more about the project here: pi-hole.net
Login to the Raspberry Pi and install Pi Hole with the following command:
curl -sSL https://install.pi-hole.net | bashChange the password to something more secure:
$ pihole -a -p
Enter New Password (Blank for no password):
Confirm Password:
[✓] New password set
Finally change the DNS server address on router settings:

And with this you are all set.