Follow me Raspberry Pi buggy using OpenCV object recognition
This is one of the most interesting and fun projects that I have done with Raspberry Pi and Open CV. It will also lead to loads of learning about openCV, facial recognition, object recognition, color tracking, object distance measurement, python thread modules and object coordinate tracking. This will be a fairly longish post, as we gradually work our way through various steps of the project. A lot of the work will leverage the earlier work that we have done with the Raspberry Pi robot modules. Also, Adrian’s tutorials are a great source of knowledge and information and I strongly recommend going through the various projects Adrian is outlined. Same goes for the posts of Mjrovai at hackster.io.
I had a fairly nebulous idea when I set out to do this project. I wanted the camera and the robot to react to some kind of object identification. Then I got a little more ambitious – why not make the robot follow the object? If you google for follow me robots, you will get a lot of wonderful projects which have achieved the same. The underlying technology used by these projects varies from infrared detection, sonar, GPS, BLE beacon and so forth. I did not have any of that hardware handy and anyway my plan for to use object identification.
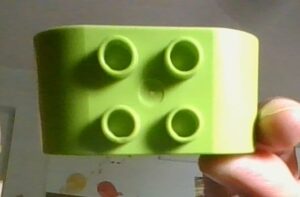
So, I decided to train my model to identify a very unique object. In my case, it was Green large lego block. The main criteria was that the object should be fairly distinctive and have uniform lighting characteristics, so as to not confuse the object identifier. The uniform lighting was critically dependent on the external lighting as well as the nature of the object. It would have a been ideal to have a luminous object such as self lit square red box. But, in the absence of such an object, the Green lego block was the next best bet
.
Color detection using OpenCV python scripts
Using this object, I set about starting my project. The very first step involved developing code that could identify my selected object. OpenCV understands the color of an object in HSV format. HSV stands for Hue, Saturation and Value. You can read more about it in the following post: https://www.hackster.io/mjrobot/automatic-vision-object-tracking-5575c4
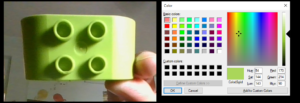
If you can use Irfanview software, then using the paint picker tool, you can quickly get the BGR and HSV values. You can also use the below script to convert BGR to HSV values:
$ cat bgr_to_hsv_conv.py
import sys
import numpy as np
import cv2
blue = sys.argv[1]
green = sys.argv[2]
red = sys.argv[3]
color = np.uint8([[[blue, green, red]]])
hsv_color = cv2.cvtColor(color, cv2.COLOR_BGR2HSV)
hue = hsv_color[0][0][0]
print(“Lower bound is :”),
print(“[” + str(hue-10) + “, 100, 100]\n”)
print(“Upper bound is :”),
print(“[” + str(hue + 10) + “, 255, 255]”)
I used my webcam to take some closeup images of my object and then used it for some quick validation.
We can use the script to make the conversion and add the values to the object color detection script
pi@raspberrypi3b:~
/work/object_recognition $ python bgr_to_hsv_co
nv.py 64 138 234
Lower bound is : [3, 100, 100]
Upper bound is : [23, 255, 255]
You can use the below code to validate the color detection done by OpenCV python scripts.
$ cat color_detection.py
import cv2
import numpy as np
# Read the picure - The 1 means we want the image in BGR
img = cv2.imread('object2.jpg', 1)
# resize imag to 20% in each axis
img = cv2.resize(img, (0,0), fx=0.2, fy=0.2)
# convert BGR image to a HSV image
hsv = cv2.cvtColor(img, cv2.COLOR_BGR2HSV)
# NumPy to create arrays to hold lower and upper range
# The “dtype = np.uint8” means that data type is an 8 bit integer
lower_range = np.array([31, 100, 100], dtype=np.uint8)
upper_range = np.array([51, 255, 255], dtype=np.uint8)
# create a mask for image
mask = cv2.inRange(hsv, lower_range, upper_range)

# display both the mask and the image side-by-side
cv2.imshow('mask',mask)
cv2.imshow('image', img)

# wait to user to press [ ESC ]
while(1):
  k = cv2.waitKey(0)
  if(k == 27):
    break
cv2.destroyAllWindows()
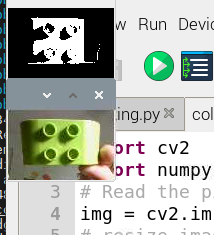
You can see the grayscale rendering of the object with the specific color.
Measuring the distance to the object using OpenCV
This is the most interesting and difficult part of the project. My idea was to detect our selected object and then measure its distance from the camera. The distance would form the basis of triggering the movement of our follow me robot. I used my laptop webcam to take photos of the objects at specific distances of 1ft, 2ft and 3ft.
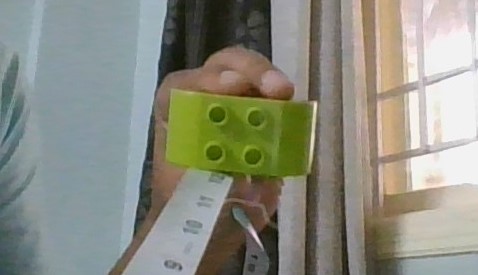
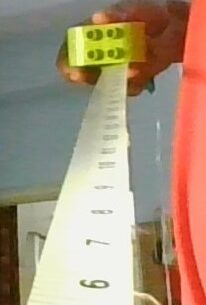
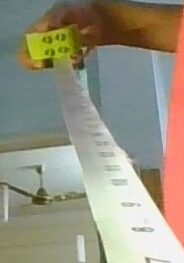
We are going to use the algorithm defined by Adrian in this post: https://www.pyimagesearch.com/2015/01/19/find-distance-camera-objectmarker-using-python-opencv/ The object at 1ft is the known key used to calculate the focal distance which is used to calculate the distance of the object from the camera.
The following code calculates the focal distance:
$ cat calculate_focal_length.py
# USAGE
# python calculate_focal_length.py
# import the necessary packages
from imutils import paths
import numpy as np
import imutils
import cv2

# define the lower and upper boundaries of the "yellow object"
# (or "ball") in the HSV color space, then initialize the
# list of tracked points

colorLower = (31, 100, 100)
colorUpper = (51, 255, 255)

def find_marker(image):
    # convert the image to grayscale, blur it, and detect edges
    hsv = cv2.cvtColor(image, cv2.COLOR_BGR2HSV)
    cv2.imshow("hsv image", hsv)

    # construct a mask for the color "green", then perform
    # a series of dilations and erosions to remove any small
    # blobs left in the mask

    mask = cv2.GaussianBlur(hsv, (11,11),0)
    cv2.imshow("blur", mask)
    mask = cv2.inRange(mask, colorLower, colorUpper)
    mask = cv2.erode(mask, None, iterations=2)
    mask = cv2.dilate(mask, None, iterations=2)

    cv2.imshow("mask", mask)

    # find the contours in the edged image and keep the largest one;
    cnts = cv2.findContours(mask.copy(), cv2.RETR_EXTERNAL, cv2.CHAIN_APPROX_SIMPLE)[-2]

#   cnts = imutils.grab_contours(cnts)
    c = max(cnts, key = cv2.contourArea)

    # compute the bounding box of the of the paper region and return it
    return cv2.minAreaRect(c)

def distance_to_camera(knownWidth, focalLength, perWidth):
    # compute and return the distance from the maker to the camera
    return (knownWidth * focalLength) / perWidth

# initialize the known distance from the camera to the object, which
# in this case is 12 inches
KNOWN_DISTANCE = 12.0
# initialize the known object width, which in this case, the lego block
# is 2.5 inches wide
KNOWN_WIDTH = 2.5

# load the furst image that contains an object that is KNOWN TO BE 2 feet
# from our camera, then find the paper marker in the image, and initialize
# the focal length

image = cv2.imread("1ft.jpg")
cv2.imshow("image", image)
marker = find_marker(image)
print ("\nmarker = ", marker)

focalLength = (marker[1][0] * KNOWN_DISTANCE) / KNOWN_WIDTH
print ("\nfocal length = ", focalLength)
# if the 'ESC' key is pressed, stop the loop

while True:
    key = cv2.waitKey(1) & 0xFF
    if (key == 27):
        break

# cleanup the camera and close any open windows
cv2.destroyAllWindows()

# focal length to be used in other programs
# focal length =  368.52037353515624

pi@raspberrypi3b:~/work/object_recognition $
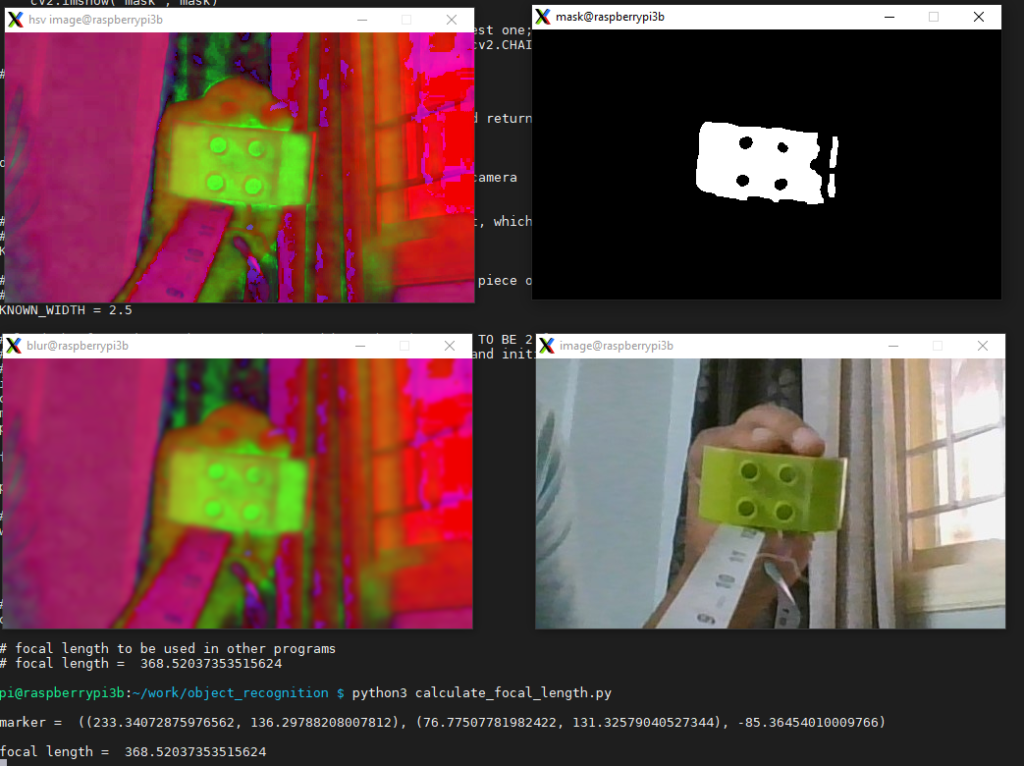
Now that we have the focal distance, we can hardcode the value to test the output of our distance measurement algorithm.
You can use the following code:
$ cat calculate_distance_test.py
# USAGE
# python calculate_focal_length.py
# import the necessary packages
from imutils import paths
import numpy as np
import imutils
import cv2

# define the lower and upper boundaries of the "yellow object"
# (or "ball") in the HSV color space, then initialize the
# list of tracked points

colorLower = (31, 100, 100)
colorUpper = (51, 255, 255)

def find_marker(image):
   # convert the image to grayscale, blur it, and detect edges
   hsv = cv2.cvtColor(image, cv2.COLOR_BGR2HSV)
   # construct a mask for the color "green", then perform
   # a series of dilations and erosions to remove any small
   # blobs left in the mask

    mask = cv2.GaussianBlur(hsv, (11,11),0)
   mask = cv2.inRange(mask, colorLower, colorUpper)
   mask = cv2.erode(mask, None, iterations=2)
   mask = cv2.dilate(mask, None, iterations=2)

   # find the contours in the edged image and keep the largest one;
   cnts = cv2.findContours(mask.copy(), cv2.RETR_EXTERNAL, cv2.CHAIN_APPROX_SIMPLE)
   cnts = imutils.grab_contours(cnts)

   c = max(cnts, key = cv2.contourArea)
   print("\nminAreaRect =" , cv2.minAreaRect(c))

    # compute the bounding box of the of the paper region and return it
   return cv2.minAreaRect(c)

def distance_to_camera(knownWidth, focalLength, perWidth):
   # compute and return the distance from the maker to the camera
   return (knownWidth * focalLength) / perWidth

# initialize the known distance from the camera to the object, which
# in this case is 12 inches
KNOWN_DISTANCE = 12.0
# initialize the known object width, which in this case, the lego block
# is 2.5 inches wide
KNOWN_WIDTH = 1.3

# load the first image that contains an object that is KNOWN TO BE 2 feet
# from our camera, then find the paper marker in the image, and initialize
# the focal length

image = cv2.imread("1ft.jpg")
cv2.imshow("image", image)
marker = find_marker(image)
print ("\nmarker = ", marker)

focalLength = (marker[1][1] * KNOWN_DISTANCE) / KNOWN_WIDTH
print ("focal length = ", focalLength)

# load the image, find the marker in the image, then compute the
# distance to the marker from the camera
image = cv2.imread("3ft.jpg")
marker = find_marker(image)
inches = distance_to_camera(KNOWN_WIDTH, focalLength, marker[1][1])

print ("inches", inches )

# draw a bounding box around the image and display it
box = cv2.cv.BoxPoints(marker) if imutils.is_cv2() else cv2.boxPoints(marker)
box = np.int0(box)
cv2.drawContours(image, [box], -1, (0, 255, 0), 2)
cv2.putText(image, "%.2fft" % (inches / 12), (image.shape[1] - 200, image.shape[0] - 20), cv2.FONT_HERSHEY_SIMPLEX,
       2.0, (0, 255, 0), 3)
cv2.imshow("image", image)

# if the 'ESC' key is pressed, stop the loop
while True:
   key = cv2.waitKey(1) & 0xFF
   if (key == 27):
       break

# cleanup the camera and close any open windows
cv2.destroyAllWindows()
pi@raspberrypi3b:~/work/object_recognition $
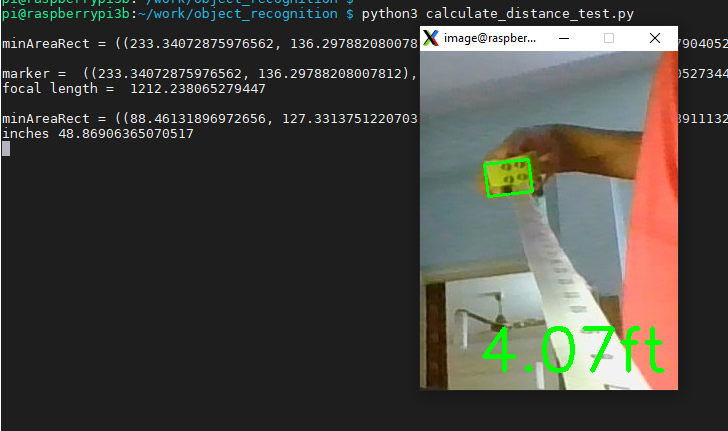
Realtime distance measurement using OpenCV
Now that we have figured out the python OpenCV algorithm to measure the distance to our object, we will try to use a live video feed. We can use the below code to do that:
$ cat calculate_distance_test_video.py
# USAGE
# python calculate_focal_length.py
# import the necessary packages
from imutils import paths
import numpy as np
import imutils
import cv2
# define the lower and upper boundaries of the "yellow object"
# (or "ball") in the HSV color space, then initialize the
# list of tracked points

colorLower = (31, 100, 100)
colorUpper = (51, 255, 255)

def find_marker(image):
   # convert the image to grayscale, blur it, and detect edges
   hsv = cv2.cvtColor(image, cv2.COLOR_BGR2HSV)
   # construct a mask for the color "green", then perform
   # a series of dilations and erosions to remove any small
   # blobs left in the mask
   mask = cv2.GaussianBlur(hsv, (11,11),0)
   mask = cv2.inRange(mask, colorLower, colorUpper)
   mask = cv2.erode(mask, None, iterations=2)
   mask = cv2.dilate(mask, None, iterations=2)

    # find the contours in the edged image and keep the largest one;
   cnts = cv2.findContours(mask.copy(), cv2.RETR_EXTERNAL, cv2.CHAIN_APPROX_SIMPLE)
   cnts = imutils.grab_contours(cnts)

    if cnts == []:
       return 0
   c = max(cnts, key = cv2.contourArea)
   print("\nminAreaRect =" , cv2.minAreaRect(c))
   # compute the bounding box of the of the paper region and return it
   return cv2.minAreaRect(c)

def distance_to_camera(knownWidth, focalLength, perWidth):
   # compute and return the distance from the maker to the camera
   return (knownWidth * focalLength) / perWidth

# initialize the known distance from the camera to the object, which
# in this case is 12 inches
KNOWN_DISTANCE = 12.0
# initialize the known object width, which in this case, the lego block
# is 2.5 inches wide
KNOWN_WIDTH = 1.3

# load the first image that contains an object that is KNOWN TO BE 2 feet
# from our camera, then find the paper marker in the image, and initialize
# the focal length

image = cv2.imread("1ft.jpg")
cv2.imshow("image", image)
marker = find_marker(image)
print ("\nmarker = ", marker)
focalLength = (marker[1][1] * KNOWN_DISTANCE) / KNOWN_WIDTH
print ("focal length = ", focalLength)

# load the image, find the marker in the image, then compute the
# distance to the marker from the camera
#image = cv2.imread("3ft.jpg")

camera = cv2.VideoCapture(0)
while True:
   # grab the current frame
   ret, frame = camera.read()
   # resize the frame, inverted ("vertical flip" w/ 180degrees),
   # blur it, and convert it to the HSV color space
   # frame = imutils.resize(frame, width=600)
   # frame = imutils.rotate(frame, angle=180)
   image = cv2.flip(frame, -1) # Flip vertically
   marker = find_marker(image)
   if marker == 0:
       cv2.imshow("image", image)
       continue
   inches = distance_to_camera(KNOWN_WIDTH, focalLength, marker[1][1])
   print ("inches", inches )

    # draw a bounding box around the image and display it
   box = cv2.cv.BoxPoints(marker) if imutils.is_cv2() else cv2.boxPoints(marker)
   box = np.int0(box)
   cv2.drawContours(image, [box], -1, (0, 255, 0), 2)
   cv2.putText(image, "%.2fft" % (inches / 12), (image.shape[1] - 200, image.shape[0] - 20), cv2.FONT_HERSHEY_SIMPLEX,
       2.0, (0, 255, 0), 3)
   cv2.imshow("image", image)

    # if the 'ESC' key is pressed, stop the loop
   key = cv2.waitKey(1) & 0xFF
   if (key == 27):
       break

# cleanup the camera and close any open windows
cv2.destroyAllWindows()
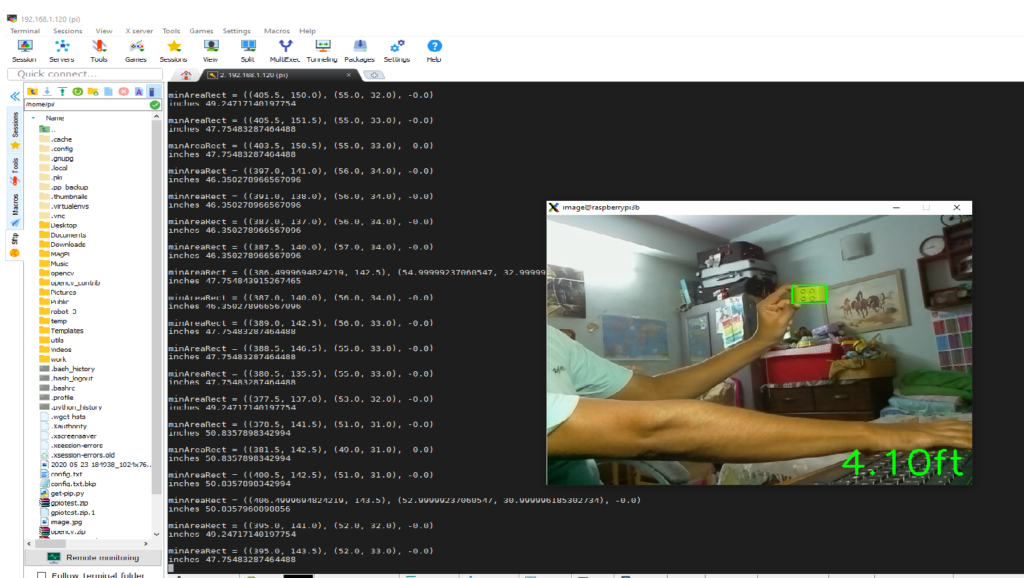
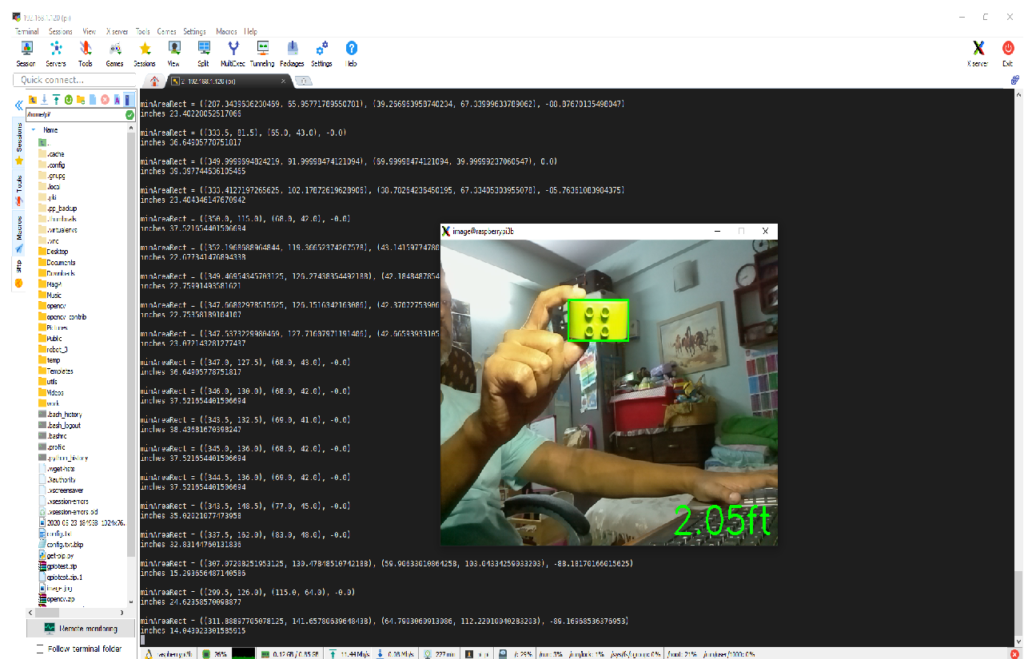
Measuring the object reference coordinates
Now that we are able to measure the distance of the object from the camera, we need a few more pieces of data. We need to decide on a center of reference for the object and if possible trace out its outline so that we know what we are tracking.
The below code will help us do that:
$ cat calculate_distance_coord_video.py
# USAGE
# python calculate_focal_length.py
# import the necessary packages
from imutils import paths
import numpy as np
import imutils
import cv2

# print object coordinates
def mapObjectPosition (x, y):
    print ("[INFO] Object Center coordenates at X0 = {0} and Y0 =  {1}".format(x, y))
# define the lower and upper boundaries of the "yellow object"
# (or "ball") in the HSV color space, then initialize the
# list of tracked points

colorLower = (31, 100, 100)
colorUpper = (51, 255, 255)

def find_marker(image):
    # convert the image to grayscale, blur it, and detect edges
    hsv = cv2.cvtColor(image, cv2.COLOR_BGR2HSV)
    # construct a mask for the color "green", then perform
    # a series of dilations and erosions to remove any small
    # blobs left in the mask
    mask = cv2.GaussianBlur(hsv, (11,11),0)
    mask = cv2.inRange(mask, colorLower, colorUpper)
    mask = cv2.erode(mask, None, iterations=2)
    mask = cv2.dilate(mask, None, iterations=2)

    # find the contours in the edged image and keep the largest one;
    cnts = cv2.findContours(mask.copy(), cv2.RETR_EXTERNAL, cv2.CHAIN_APPROX_SIMPLE)
    cnts = imutils.grab_contours(cnts)

    if cnts == []:
        return 0,0,0,0,0

    c = max(cnts, key = cv2.contourArea)
    print("\nminAreaRect =" , cv2.minAreaRect(c))
    ((x, y), radius) = cv2.minEnclosingCircle(c)
    M = cv2.moments(c)
    center = (int(M["m10"] / M["m00"]), int(M["m01"] / M["m00"]))

    # compute the bounding box of the of the paper region and return it
    return cv2.minAreaRect(c), x, y, radius, center

def distance_to_camera(knownWidth, focalLength, perWidth):
    # compute and return the distance from the maker to the camera
    return (knownWidth * focalLength) / perWidth

# initialize the known distance from the camera to the object, which
# in this case is 12 inches
KNOWN_DISTANCE = 12.0
# initialize the known object width, which in this case, the lego block
# is 2.5 inches wide
KNOWN_WIDTH = 1.3

# load the first image that contains an object that is KNOWN TO BE 2 feet
# from our camera, then find the paper marker in the image, and initialize
# the focal length

image = cv2.imread("1ft.jpg")
cv2.imshow("image", image)
marker, x, y, radius, center = find_marker(image)
print ("\nmarker = ", marker)
focalLength = (marker[1][1] * KNOWN_DISTANCE) / KNOWN_WIDTH

print ("focal length = ", focalLength)

# load the image, find the marker in the image, then compute the
# distance to the marker from the camera
camera = cv2.VideoCapture(0)

while True:
    # grab the current frame
    ret, frame = camera.read()
    # resize the frame, inverted ("vertical flip" w/ 180degrees),
    # blur it, and convert it to the HSV color space

    image = cv2.flip(frame, -1) # Flip vertically
    marker, x, y, radius, center = find_marker(image)

    if marker == 0:
        cv2.imshow("image", image)
        continue

    inches = distance_to_camera(KNOWN_WIDTH, focalLength, marker[1][1])
    cv2.circle(image, center, 5, (0, 0, 255), -1)

    # position Servo at center of circle
    mapObjectPosition(int(x), int(y))

    print ("inches", inches )

    # draw a bounding box around the image and display it
    box = cv2.cv.BoxPoints(marker) if imutils.is_cv2() else cv2.boxPoints(marker)
    box = np.int0(box)
    cv2.drawContours(image, [box], -1, (0, 255, 0), 2)
    cv2.putText(image, "%.2fft" % (inches / 12), (image.shape[1] - 200, image.shape[0] - 20), cv2.FONT_HERSHEY_SIMPLEX,
        2.0, (0, 255, 0), 3)
    cv2.imshow("image", image)

    # if the 'ESC' key is pressed, stop the loop
    key = cv2.waitKey(1) & 0xFF

    if (key == 27):
        break

# cleanup the camera and close any open windows
cv2.destroyAllWindows()
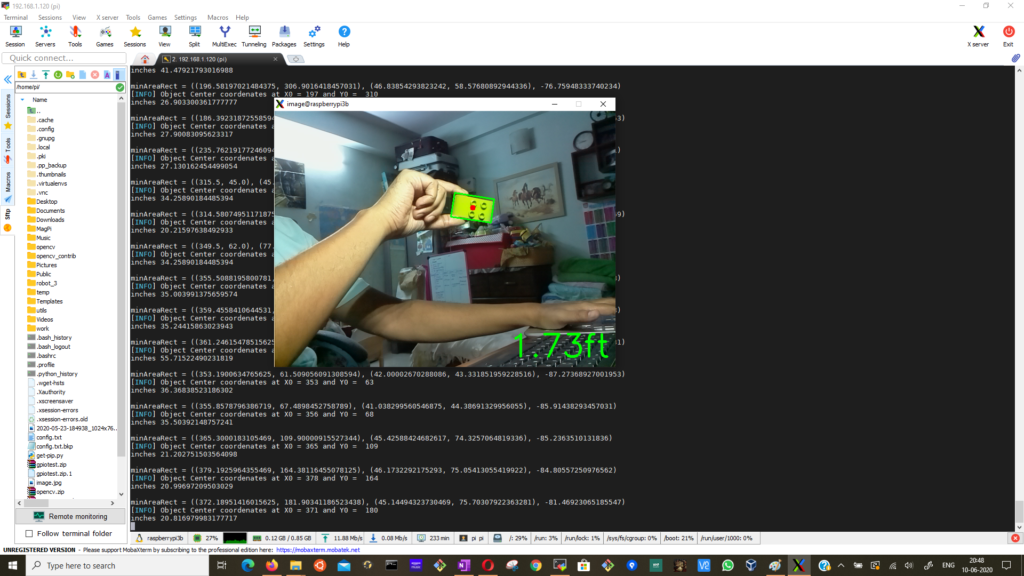
Driving the camera servo and robot motors
We now come to the fun part. We will use the center of reference coordinates discovered using our previous piece of code to realign our camera using the servo’s and move our robot buggy closer or farther from the target, so that it stays roughly at a distance of 1 foot from the target object. We will also follow the object using left and right turns.
We will be leveraging a lot of the earlier work we have done with our robot buggy here and here. We have broken up the movements of the camera servo as well as the buggy motors in to smaller scripts. You might have to experiment a bit to get the granularity of movement. The GPIO pins used are same as the earlier schematics.
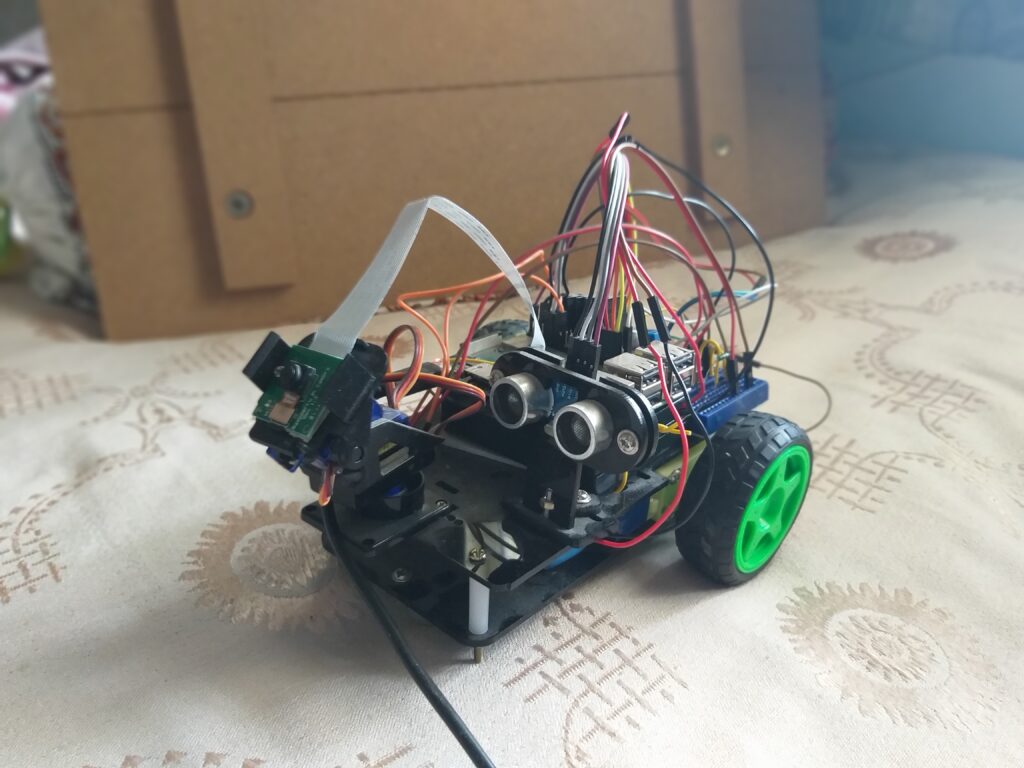
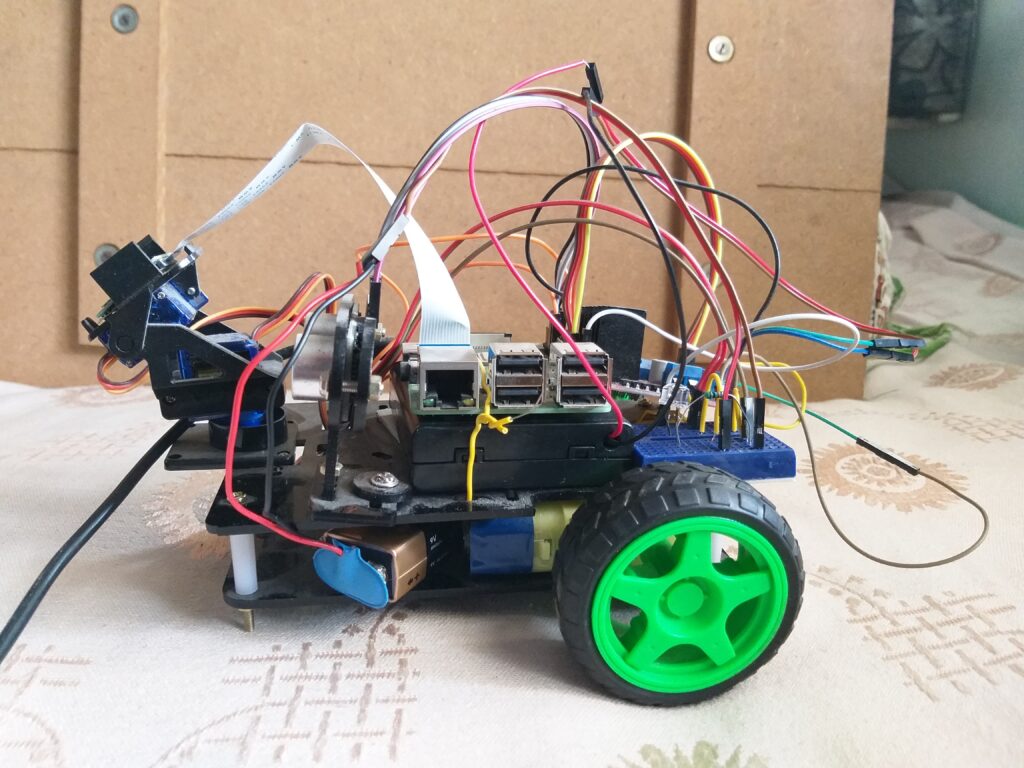
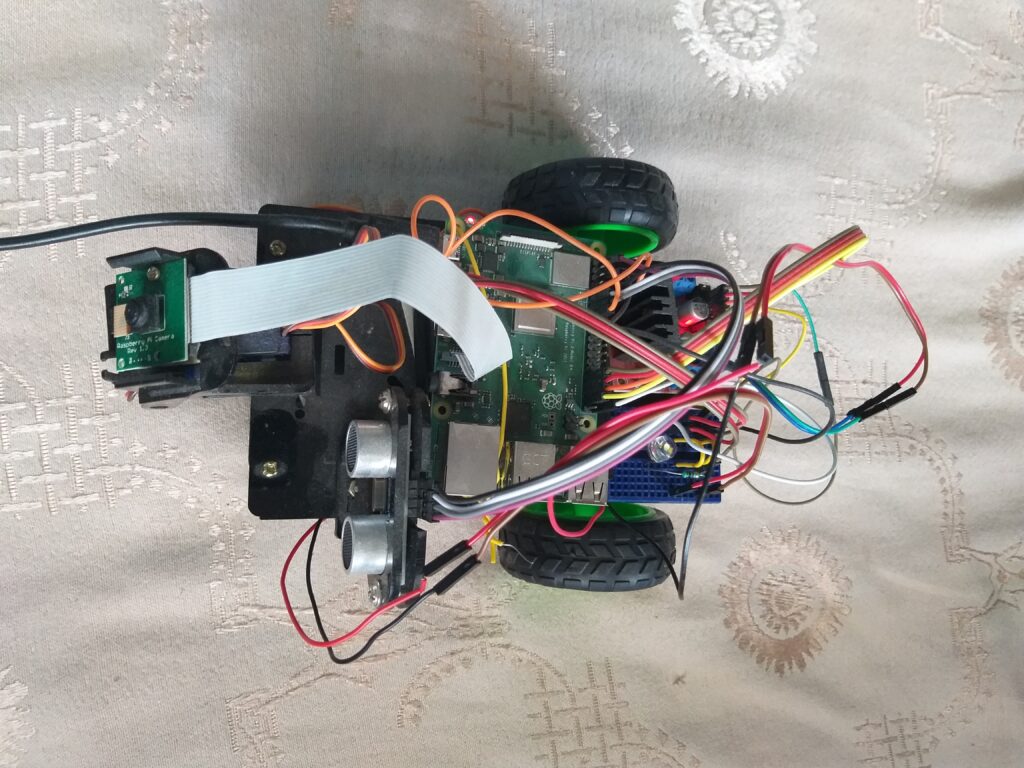
The camera servo movements:
pi@raspberrypi3b:~/work/object_recognition $ cat uptilt.cgi
#!/bin/bash
echo "p1-15=-5" > /dev/servoblaster

pi@raspberrypi3b:~/work/object_recognition $ cat downtilt.cgi
#!/bin/bash
echo "p1-15=+5" > /dev/servoblaster

pi@raspberrypi3b:~/work/object_recognition $ cat center.cgi
#!/bin/bash
echo "p1-12=60%" > /dev/servoblaster
echo "p1-15=25%" > /dev/servoblaster

pi@raspberrypi3b:~/work/object_recognition $ cat rightpan.cgi
#!/bin/bash
echo "p1-12=+3" > /dev/servoblaster

pi@raspberrypi3b:~/work/object_recognition $ cat leftpan.cgi
#!/bin/bash
echo "p1-12=-3" > /dev/servoblaster

The buggy motor movements:

pi@raspberrypi3b:~/work/object_recognition $ cat forward.py
#!/usr/bin/pythonRoot

from gpiozero import Robot
from time import sleep
from gpiozero import DistanceSensor
robby = Robot (left=(6,13), right=(26,19))
robby.forward()
sleep(.2) # for < ~1 ft distance
robby.stop()

pi@raspberrypi3b:~/work/object_recognition $ cat backward.py
#!/usr/bin/pythonRoot
from gpiozero import Robot
from time import sleep
robby = Robot (left=(6,13), right=(26,19))
robby.backward()
sleep(.2) # for < ~1 ft distance
robby.stop()

pi@raspberrypi3b:~/work/object_recognition $ cat right.py
#!/usr/bin/pythonRoot
from gpiozero import Robot
from time import sleep
robby = Robot (left=(6,13), right=(26,19))
robby.right()
sleep(.2) # for 90 deg turn
robby.stop()

pi@raspberrypi3b:~/work/object_recognition $ cat left.py
#!/usr/bin/pythonRoot
from gpiozero import Robot
from time import sleep
robby = Robot (left=(6,13), right=(26,19))
robby.left()
sleep(.2) # for 90 deg turn
robby.stop()

pi@raspberrypi3b:~/work/object_recognition $
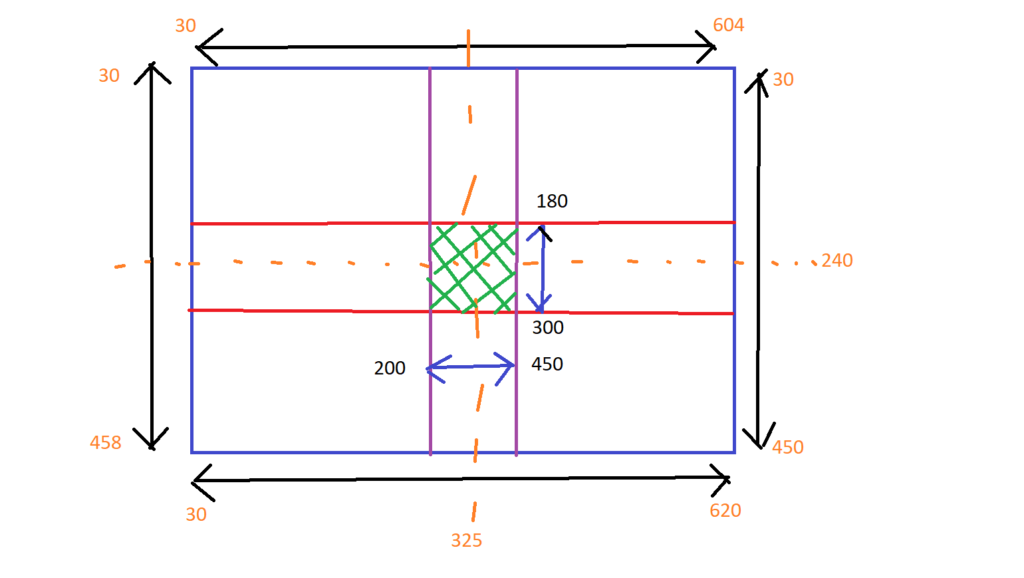
We will have to calculate the window within which we should aim to keep our object in focus. We will move the camera up or down and the buggy side left or right to make sure that the object stays in focus. The green area in the plot on the right is our are of focus within which we will keep our object.
And finally the code that will integrate all these functions:
$ cat dist_coord_servo_motor_fire.py
# import the necessary packages
from imutils import paths
import numpy as np
import imutils
import cv2
import os
import time
from time import sleep
import threading
import RPi.GPIO as GPIO    # Import Raspberry Pi GPIO library
# set LED GPIO
warnLed = 21
GPIO.setmode(GPIO.BCM)
GPIO.setwarnings(False)
GPIO.setup(warnLed, GPIO.OUT)
GPIO.output(warnLed, GPIO.LOW)

#ledOn = False
ledState="off"

def flashLed(e, t):
    """flash the LED every second"""
    while not e.isSet():
        time.sleep(1)
        if(ledState=="on"):
            GPIO.output(warnLed, GPIO.HIGH) #switch off the LED
        #    time.sleep(1)
        #    GPIO.output(warnLed, GPIO.LOW)
        if(ledState=="off"):
            GPIO.output(warnLed, GPIO.LOW)
         #   time.sleep(.1)

e = threading.Event()
t = threading.Thread(name='non-block', target=flashLed, args=(e, 2))
t.start()

# print object coordinates
def mapObjectPosition (x, y):
    print ("[INFO] Object Center coordinates at X0 = {0} and Y0 =  {1}".format(x, y))
    if (x < 250):
        os.system("./left.py")
        sleep(.2)
        print ("[INFO] panning right")

    elif (x > 400):
        os.system("./right.py")
        sleep(.2)
        print ("[INFO] panning left")

    elif (y < 190):
        os.system("./uptilt.cgi")
        sleep(.2)
        print ("[INFO] panning up")

    elif (y > 290):
        os.system("./downtilt.cgi")
        sleep(.2)
        print ("[INFO] panning down")

    else:
        sleep(0.2)
        print ("[INFO] within window")
        ledState = "on"
        GPIO.output(warnLed, GPIO.HIGH)
        print ("[INFO] Got a lock! and firing.. !")

def mapObjectDistance(d):
    print ("[INFO] Object Center disatance is d = {0}".format(d))
    if (d < 6): # hude tolerance due to inaccuracy of distance measurement
        os.system("./backward.py")
        #sleep(.2)
        print ("[INFO] stepping back")

    elif (d > 20):
        os.system("./forward.py")
        #sleep(.2)
        print ("[INFO] stepping forward")

    else:
        sleep(0.2)
        print ("[INFO] about 1 ft away")

# define the lower and upper boundaries of the "yellow object"
# (or "ball") in the HSV color space, then initialize the
# list of tracked points

colorLower = (31, 100, 100)
colorUpper = (51, 255, 255)

def find_marker(image):
    # convert the image to grayscale, blur it, and detect edges
    hsv = cv2.cvtColor(image, cv2.COLOR_BGR2HSV)
    # construct a mask for the color "green", then perform
    # a series of dilations and erosions to remove any small
    # blobs left in the mask
    mask = cv2.GaussianBlur(hsv, (11,11),0)
    mask = cv2.inRange(mask, colorLower, colorUpper)
    mask = cv2.erode(mask, None, iterations=2)
    mask = cv2.dilate(mask, None, iterations=2)

    # find the contours in the edged image and keep the largest one;
    cnts = cv2.findContours(mask.copy(), cv2.RETR_EXTERNAL, cv2.CHAIN_APPROX_SIMPLE)
    cnts = imutils.grab_contours(cnts)

    if cnts == []:
        return 0,0,0,0,0

    c = max(cnts, key = cv2.contourArea)
    ((x, y), radius) = cv2.minEnclosingCircle(c)
    M = cv2.moments(c)
    center = (int(M["m10"] / M["m00"]), int(M["m01"] / M["m00"]))

    # compute the bounding box of the of the paper region and return it
    return cv2.minAreaRect(c), x, y, radius, center

def distance_to_camera(knownWidth, focalLength, perWidth):
    # compute and return the distance from the maker to the camera
    return (knownWidth * focalLength) / perWidth

# initialize the known distance from the camera to the object, which
# in this case is 12 inches
KNOWN_DISTANCE = 12.0
# initialize the known object width, which in this case, the lego block
# is 2.5 inches wide
KNOWN_WIDTH = 1.3

# load the furst image that contains an object that is KNOWN TO BE 2 feet
# from our camera, then find the paper marker in the image, and initialize
# the focal length

image = cv2.imread("1ft.jpg")
cv2.imshow("image", image)
marker, x, y, radius, center = find_marker(image)

focalLength = (marker[1][1] * KNOWN_DISTANCE) / KNOWN_WIDTH
os.system("./center.cgi")

# load the image, find the marker in the image, then compute the
# distance to the marker from the camera

camera = cv2.VideoCapture(0)

while True:
    # grab the current frame
    ret, frame = camera.read()
    # resize the frame, inverted ("vertical flip" w/ 180degrees),
    # blur it, and convert it to the HSV color space
    # frame = imutils.resize(frame, width=600)
    # frame = imutils.rotate(frame, angle=180)

    image = cv2.flip(frame, -1) # Flip vertically
    marker, x, y, radius, center = find_marker(image)
    if marker == 0:
        cv2.imshow("image", image)
        continue

    inches = distance_to_camera(KNOWN_WIDTH, focalLength, marker[1][1])
    cv2.circle(image, center, 5, (0, 0, 255), -1)

    # position Servo at center of circle
    mapObjectPosition(int(x), int(y))
    mapObjectDistance(int(inches))
    # draw a bounding box around the image and display it
    box = cv2.cv.BoxPoints(marker) if imutils.is_cv2() else cv2.boxPoints(marker)
    box = np.int0(box)
    cv2.drawContours(image, [box], -1, (0, 255, 0), 2)
    cv2.putText(image, "%.2fft" % (inches / 12), (image.shape[1] - 200, image.shape[0] - 20), cv2.FONT_HERSHEY_SIMPLEX,
        2.0, (0, 255, 0), 3)
    cv2.imshow("image", image)

    # if the 'ESC' key is pressed, stop the loop
    key = cv2.waitKey(1) & 0xFF
    if (key == 27):
        break

# cleanup the camera and close any open windows
# Do a bit of cleanup

print("\n [INFO] Exiting Program and cleanup stuff")

"""exit the blinking thread"""

e.set()

"""turn  off the LED"""
GPIO.output(warnLed, GPIO.LOW)
camera.release()
cv2.destroyAllWindows()
pi@raspberrypi3b:~/work/object_recognition $
One of the fun things that we do with this code is that we simulate firing at the object when it is within our specified window by triggering the led.
Thats all folks! Hope you have fun with this.